Wednesday, September 24, 2014

Still lives in the studio (part 2)- Advertising

I completed 2 of my studio modules at college. Both of these involved creating a final piece based on any area of studio photography that I wanted to explore. And both times I chose advertising. The first time, simply because I hadn't done it before and so it was a challenge to see if I could produce something that stuck to the conventions of this genre of photography. I was so pleased with how that image turned out hence why I chose advertising again for the second module. 
advertising studio still life
You may have seen this image in a previous post. I took it in my first year at college and it was displayed at the end of year exhibition. 

Anyway, for the final piece, we had to write ourselves a brief as if it was from an external client and then fulfil it. I wrote a brief from Coventry city council requesting and image to be used for a poster campaign encouraging primary school age children to drink milk. My solution to this was to make the milk bottle look more attractive by decorating it in some sort of crazy way and photographing it in a simple set up. 

Before shooting I did a fair amount of research, looking at existing images used for advertising, which helped me to decided on the look of my image. I decided to go for a spot light on the background to highlight the iconic shape of the milk bottle and the reflective surface to give the image depth.

And as for the decoration of the bottle, I came up with a couple of options.  The first one I covered in furry cow material and the second I painted in on a cow pattern in crazy colours.
advertising studio still life
I think that the fur covered milk bottle works best as the graduating tones in the background works better with the black and white pattern. 

Working out how to light the background was a trial and error process as I knew what I wanted it to look like but I wasn't really sure how to achieve it. 
advertising studio still life
I started off trying to light it from an angle by positioning the flash head with a honey comb reflector to the right of the camera. However this caused the light to fan out (hmm... is that the right phrase?) so I tried replacing the reflector with a snoot to try and create a more directed beam of light.
advertising studio still life
This did create more of a spot light but not in the centre of the background. So I then went back to the honey comb reflector, brought the light stand down as low as it would go and place it in the middle of the frame so it produced a circle of light where I wanted it. 
advertising studio still life
I just had to be careful to make sure I placed the milk bottle so the flash head was hidden behind it!
advertising studio still life
And so this is the final images I presented for my final assessment. I was so pleased with how this came out that it inspired the composition for my college FMP.

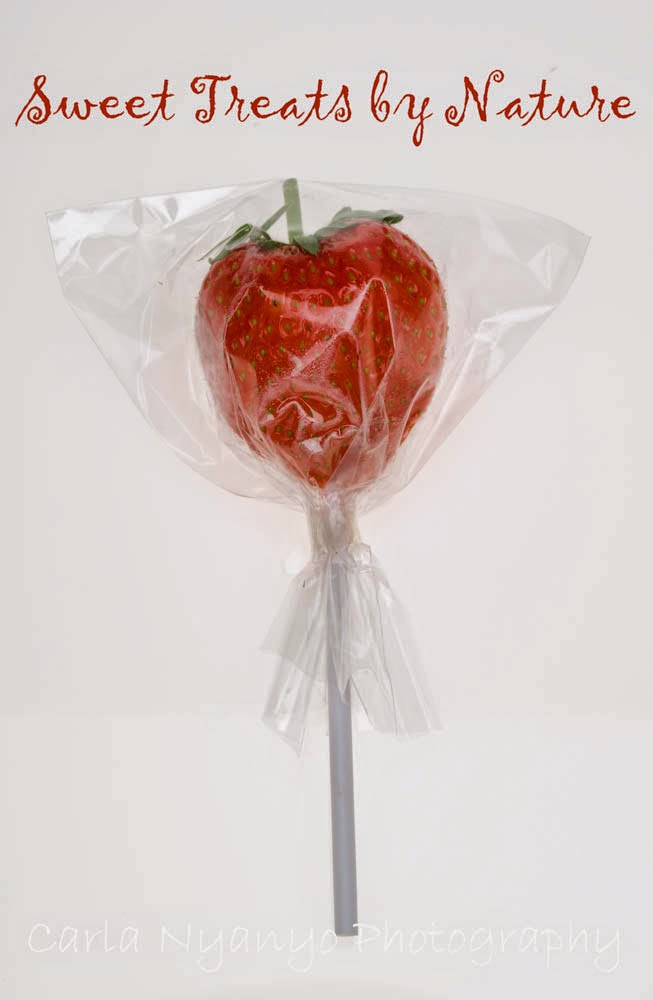
The second studio advertising project I did was a continuation on the theme of getting school kids to make healthy choices by turning fruit into sweets. (It sounds like I have an obsession with healthy eating- really, I don't)

For this I used a scoop background which I back lit with a soft box in order to get it nice and even.
The slogan "Sweet Treats by Nature" I came up with myself. Lets face it, it's not the best but then my main concern was the photography. 
I had some problems with the lighting. Because most of fruit I was photographing was surrounded by transparent materials, when I had the correct exposure to make the background pure white the subtle details in the clear wrappers and glass sweet jar were washed out. In the end I worked out a system where I lit the background partly from behind and partly from the bottom. Although the end result is not pure white, it is an even tone of white and all the details are still visible so I felt this was a good compromise. 
I found working with fruit soooo much more difficult than I thought it would be! Firstly (and probably most obviously), fruit is perishable. I did 5 test shoots working out the lighting, plus a final shoot which meant I had to buy 6 lots of fresh fruit. And secondly, fruit is soft and so I had some issues dressing it up, especially wrapping the raspberries. You can probably see in the image above that it's starting to leak.
Overall, I'm not sure I completed this project to the best of my ability. I think I had a good idea but my execution still needs some work. Maybe if I'd had time to review again and do another shoot the final images would be more refined. 

Wednesday, September 17, 2014

Still lives in the studio (part 1)- Fine art

So, several of my modules at college and at uni so far have been studio based. Hmm... in fact, there have been 3 in total. All of which have involved an exploration of some of the different categories of studio photographing, including fine art still life. Well, I say "fine art", mostly because I didn't produce the images with any particular purpose in mind.

Right then, let's start at the beginning. 
studio still life fine art
This is the first still life I shot by myself (although I did get in a little bit of a pickle trying to back light it with the textured back which didn't work at all but that is a long story. Basically I ended up lighting the whole thing from above with a single soft box). It's loosely based around the life cycle of a flower and I mean very loosely. This is not the best planned shoot I've ever done and I didn't think about making sure I had flowers of the same type at different stages of the life cycle until the morning of the shoot. So in an attempt to have some kind of consistency through out the image, I chose flowers that were all the same colour. I shot on digital and 5x4 black and white film. 
studio still life fine art
This was also the first time I used a 5x4 camera on my own. I found it quite daunting, it seemed so much bigger and more fragile that the camera's I had used before, and was worried to whole time I was going to break it! Fortunately everything went ok and I processed the film myself in the darkroom. For speed (as I had already started my final piece by the time I had developed the negative) instead of printing an image in the darkroom, I scanned the negative and edited it on the computer using photoshop and lightroom. Given the issues I had at the start of the shoot with lighting (and also with the composition- that started out a real mess!) I'd say the final image is a success. My tutors seemed to think so too as they chose it to be exhibited at a local art gallery at the end of the year (which I have already posted about). I also put it in the portfolio that I took to my university interviews.

The next shoot I did for the second studio module I felt confident enough to not need to shoot on digital first and went straight for 5x4.
studio still life fine art
I shot 2 sheets of film, 1 that I developed for the recommended time and a 2nd that I over developed in an attempt to maximise the contrast in the image. I also shot a similar composition on a white background. 
studio still life fine art
The white background definitely works better with these shells as there isn't much variation between the tones of the background and those of the subject. Therefore, the subtle variations that there are, are more easily captured (or something like that anyway). 

Both times I developed and printed the images myself in the darkroom. It was all very exciting (I got to use the big enlarger!). 


studio still life fine art
This is a shoot I did using a digital camera with the college's macro lens. I had all kinds of problems on this shoot mainly with the lens and the lighting. The lens was not the best quality and had focusing issues. There was no manual focus setting and a lot of time was wasted trying to get it to focus automatically. And the lighting.... phew! Nightmare! I wanted it to be even and I tried every kind of combination of lights I could think of and nothing seemed to work. I couldn't use a single light above because this is where the camera was and I couldn't find a position for it that didn't cause some kind of a shadow. So then I figured that I could use 2 lights, 1 on the left and 1 on the right, that were the same power and this would eliminate harsh shadows. Which they did but surely if the power is equal there should be no shadow......? I don't know and in the end I just went with it. Looking back now, having the shadows probably isn't such a bad thing as they just add form and depth to the image.


studio still life fine art
This shoot was really a technical exercise in how to successfully back light a background. I planned this shoot on medium format 6x6 black and white film but because this was a lighting technique that I hadn't had much success with before I decided to shoot on digital as well, just to make sure I was doing it right.
studio still life fine art
Admittedly, this is not the best copy of this photograph. In fact, it's quite awful. I don't have an appropriate scanner at home and I didn't make a full size print in the darkroom. So I scanned this from a contact print. To be honest, I'm not too sure about this photo. I had wanted to frame it much closer so that the 4 sides of the frame would be touching the globe. Unfortunately, my globe is too small and the lens I was using couldn't focus that close to it. I settled for composing it in the middle of the frame but I think maybe I should have put it in the bottom 1/3. 


studio still life fine art
This is from a shoot I did at uni with another student (shout out to Nikki Bowen!). Our task was to create a copy of a traditional still life painting, digitally and on medium format colour film. We chose a painting by Jean Baptiste Simeon Chardin. It was quite a challenge getting the props and lighting as close to the painting as possible. We really had to look at where the shadows fell to determine the correct positioning of the lights and as for the props, we trawled the charity shops of Hereford looking for as close as we could get!
studio still life fine art
This is the medium format version. It's safe to say that we had some compositional issues. We were set up on a small desk so there wasn't huge amount of allowance either side or below (the bottom of the the frame is literally the bottom of the desk!) We also had problems with the scanner. Even though we picked the correct film format (6x6) it seemed to not be able to tell where each negative was on the strip. Basically, I think that using film was good as it has a much more painterly feel to it however, our execution could have been better. I personally feel that we should have used a 645 or 6x7 format, unfortunately 6x6 was what was available to us at the time. 

The final still life is an independent shoot I did at uni called "my breakfast".
studio still life fine art
Now, I know what you're thinking. "This is what she eats for breakfast!?". Why yes, yes it is. Trust me, weetabix with margarine spread on top is delicious and everybody should try it!

Personally, I think I could have refined this idea further. I was tight for time in the studio as I was sharing my slot with Nikki and we had limited lighting available because there was another group working at the same time as us. I ended up only being able to light the background from one side and over exposing it by about 2 stops (I would have liked to make it a bit brighter but I didn't want to loose too much depth of field, which I fear I have slightly). I also now see that my shutter speed was too fast and didn't sync properly with the flash, which is the black line running down the left of the image. 

Overall, this isn't the worst photograph I've ever taken but it's certainly not the best. I like my concept (nice and simple!) but like I said, I think a little more time and perhaps another shoot after a period of reflection would have resulted in much improvement.

And now I realise I've rambled quite a lot in this post. I do hope you made it to the end!

Wednesday, September 10, 2014

Flash blur- experimenting on location

location photography
This is a technique that I learnt at the end of my first year at college and practised through the summer holidays. The way it works, is by using an external flash gun on camera with a slow shutter speed. When flash fires, where the light hits the subject is frozen and the long shutter speed captures movement (from either the subject or the photographer themselves). The result is this strange kind of mixture of sharpness and blurriness in the same image.

Over that summer I took many trips the park with my brothers and made them do all sort of strange things while I snapped away trying out this technique. Fortunately they were very patient with me. The whole thing is very unpredictable (thankfully I was shooting in digital or who knows how many roles of film I would have used!) and so I shot hundreds of photographs but these are a few of the ones that I think turned out quite well.
location photography
When I returned to college in September we were given the task of shooting flash blur with film, having had the summer to "master" the technique. I had a 24 exp film as so as not to waste any I really had to think about getting the balance between the flash and ambient exposures. With digital it was easy, I could see instantly if the image was over exposed, correct it accordingly and re-shoot. Obviously with film, you don't have that luxury, and so I found it much more challenging. 
location photography